The Ultimate Setup Guide for Your Sigma 12mm f/1.4 DC DN Contemporary
The Sigma 12mm f/1.4 DC DN Contemporary has emerged as a cornerstone lens for APS-C mirrorless photographers and videographers. Representing the widest entry in Sigma’s revered "Contemporary" prime quartet for cropped sensors, this lens offers a 35mm equivalent focal length of 18mm. This specific focal length occupies a "sweet spot" for creators, sitting perfectly between the ultra-wide distortion of 10mm lenses and the more standard wide-of-center feel of 16mm alternatives. Whether capturing the sweeping vistas of the Pacific Northwest or documenting a crowded interior for an architectural portfolio, high-quality wide-angle glass is essential. However, simply mounting the lens to a camera body is only the first step. To truly harness its optical potential and f/1.4 light-gathering capabilities, a systematic approach to setup, calibration, and support hardware is required.
Understanding the Optical Engineering and Performance
Before diving into the technical setup, one must appreciate the engineering that makes the Sigma 12mm f/1.4 unique. Unlike many wide-angle lenses that sacrifice corner sharpness to achieve a fast aperture, Sigma utilized a complex optical formula consisting of 17 elements in 15 groups. This includes two Aspherical elements and several Low Dispersion (FLD and SLD) glass elements designed to combat chromatic aberration and sagittal coma flare. For the user, this means that even at its widest aperture of f/1.4, the lens maintains impressive contrast and detail across the frame. Buyers typically care most about three things with a lens like this: low-light performance for astrophotography, autofocus speed for vlogging, and edge-to-edge sharpness for landscapes. The Sigma 12mm tackles all three by marrying a large glass diameter with a high-speed stepping motor.
The physical design of the lens also influences the setup. Despite its "Contemporary" branding—which usually implies a focus on portability—this lens is a substantial piece of glass. It features a dust- and splash-resistant structure with a rubber-sealed brass bayonet mount. The inclusion of a dedicated Aperture Ring (with a de-click switch) and a customizable AFL button indicates that Sigma intends for this to be treated as a professional-grade tool. Recognizing these physical attributes allows the user to balance their rig properly, ensuring that the front-heavy nature of the lens does not compromise stability during long exposures or handheld stabilization.
The Initial Hardware Integration
Integrating the Sigma 12mm f/1.4 into a camera system starts with physical mounting and balancing. Given that this lens is significantly heavier than a standard kit lens or even Sigma's own 16mm f/1.4, it can significantly shift the center of gravity of a compact mirrorless body like the Sony A6000 series or Fujifilm X-T series. For photographers using a tripod, it is highly recommended to use an L-bracket or a larger quick-release plate to provide a more stable base. For videographers, the front-heavy nature of the 12mm means that gimbal balancing requires moving the camera plate further back on the tilt axis. If the lens is being used with a small camera body, a cage might be necessary to provide better ergonomics and more mounting points for accessories like microphones or monitors.
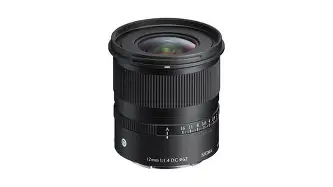
The lens comes with a petal-type hood (LH654-01). While it may be tempting to leave this in the box to save space, the 12mm’s large front element is susceptible to stray light which can cause ghosting or flare in high-contrast scenes. Always keep the hood attached, not only for contrast preservation but also as a physical buffer for that expansive front element. Since the lens uses a standard 67mm filter thread, selecting the right protective or creative filters is the next logical step in the setup process. Given the wide angle of view, cheap, thick-rimmed filters can cause mechanical vignetting in the corners. Opting for "slim" or "nano-coated" filters ensures that the field of view remains unobstructed while protecting the specialized glass coatings from fingerprints and environmental debris.
Camera Body Configuration for Wide-Angle Success
Once the lens is mounted, the camera’s internal software must be optimized to handle a wide-angle, fast-aperture prime. One of the most important settings for the Sigma 12mm f/1.4 is Lens Compensation. Most modern mirrorless bodies have specific profiles for Sigma Contemporary lenses. Ensure that "Peripheral Illumination Correction," "Chromatic Aberration Correction," and "Distortion Correction" are set to Auto or On. While the 12mm is optically excellent, every wide-angle lens exhibits some degree of barrel distortion and corner darkening at f/1.4. Allowing the camera to apply real-time corrections significantly reduces post-processing labor, especially for JPEG shooters and videographers.
Focus settings are equally critical. The 12mm f/1.4 uses a high-speed stepping motor that is virtually silent, making it an elite choice for video. For vlogging or environmental portraits, Eye-Autofocus (Eye-AF) should be prioritized. At 12mm, your depth of field is naturally deeper than it would be on a telephoto lens, but at f/1.4, a subject close to the lens can still have a beautifully blurred background. The AFL button on the side of the lens is a powerful setup tool; many professionals map this to "Focus Hold" or "Eye-AF Start" to allow for quick adjustments without moving their hands from the lens barrel. For manual focus enthusiasts or astrophotographers, enabling Focus Peaking and Focus Magnification in the camera menu is essential for nailing the point of infinity focus in the dark.
Find top-rated Cameras & Photography products at great prices.
See Deals →Detailed Product Analysis and Usage Tiers
To evaluate where this lens fits into a photographer’s bag, we must look at performance across different f-stops and environments. At f/1.4, the center of the frame is tack-sharp. This makes it a rare wide-angle lens capable of producing high-subject separation, or "bokeh," in close-up shots. As you stop down to f/4.0 and f/5.6, the corners improve dramatically, reaching peak performance for landscape and architectural work. The 12mm focal length is particularly adept at "leading the eye," using foreground elements to draw the viewer into a scene. However, this requires careful composition; if the camera is tilted too far up or down, vertical lines in buildings or trees will appear to lean inward—a phenomenon known as perspective distortion. Proper setup involves using the camera's built-in electronic level to ensure a perfectly straight horizon unless the distortion is intended for creative effect.
Pros and Cons of the Sigma 12mm f/1.4 DC DN
- Pro: Exceptional Low Light Performance – The f/1.4 aperture allows for lower ISO settings in dim environments, making it perhaps the best APS-C lens currently available for handheld indoor photography and astrophotography.
- Pro: Manual Controls – Including an aperture ring with a "De-click" toggle allows videographers to make silent, smooth exposure changes mid-recording, while photographers can enjoy tactile, old-school control.
- Pro: Build Quality – The Thermally Stable Composite (TSC) construction and weather sealing at the mount give the lens a premium, durable feel that rivals much more expensive professional series glass.
- Pro: Ultra-Wide Field of View – The 18mm equivalent focal length is wide enough for interiors but tight enough to avoid the extreme "fisheye" look that can ruin professional photos.
- Con: Size and Weight – It is noticeably bulky for an APS-C prime, which may frustrate users looking for a "pancake" or lightweight travel setup.
- Con: Flare Sensitivity – Despite advanced coatings, its wide front element can pick up lens flares when shooting directly into the sun if the hood is not utilized.
- Con: Focus Stretching – Like many wide primes, there is a minor amount of "focus breathing" where the frame size changes slightly as the focus point moves, which may be a concern for high-end cinema work.
Comparative Analysis with Market Competitors
When choosing a wide-angle lens for an APS-C system, buyers often weigh the Sigma 12mm against its siblings and competitors from original equipment manufacturers (OEMs). The following table highlights the key differences between the Sigma 12mm and other popular wide-angle options in the same ecosystem.
| Lens Model | Aperture | Weight (approx.) | Filter Size | Primary Benefit |
|---|---|---|---|---|
| Sigma 12mm f/1.4 DC DN | f/1.4 | 495g | 67mm | Best for low-light and astrophotography |
| Sigma 16mm f/1.4 DC DN | f/1.4 | 405g | 67mm | More versatile "standard-wide" for portraits |
| Sony E 11mm f/1.8 | f/1.8 | 181g | 55mm | Extremely light, better for small gimbals |
| Fujinon XF 14mm f/2.8 R | f/2.8 | 235g | 58mm | Compact with physical focus clutch |
| Viltrox 13mm f/1.4 AF | f/1.4 | 420g | 67mm | Affordable alternative with slightly less contrast |
Comprehensive Buying Guide: Who Is This For?
Choosing the Sigma 12mm f/1.4 requires an assessment of your primary photographic subjects. This lens is not a generic "all-rounder." It is a specialized tool. If you are a travel photographer who likes to hike, you must consider if you are willing to carry the half-kilogram weight of this lens in exchange for the extra stop of light. For many, the answer is yes, because the 12mm allows you to capture the Milky Way or a dim European cathedral with a clarity that f/2.8 or f/4 zooms simply cannot match.
Primary User – The Astrophotographer: This is the premier choice for stars. The f/1.4 aperture allows you to keep exposure times shorter, which prevents "star trailing" without needing a motorized equatorial mount. The low coma ensures that stars stay as points of light rather than smudges, even in the corners. For this setup, you will need a sturdy tripod and a wireless shutter release.
Secondary User – The Vlogger: For content creators, 12mm is an ideal focal length for "talking head" shots while holding the camera at arm's length. It provides enough background context to make the video interesting but keeps the face prominent. The fast aperture creates a professional separation between the vlogger and a busy background. However, you should pair this with an external microphone, as the wide field of view might pick up a lot of ambient room noise.
Tertiary User – The Real Estate Photographer: While many real estate photographers prefer zooms, the Sigma 12mm offers a level of sharpness and low distortion that makes small rooms look spacious and high-end. When used on a tripod at f/8, it provides incredible detail from the foreground rug to the far corner of the kitchen. If you find zooms too soft at their wide ends, this prime is the logical upgrade.
Looking for the best Cameras & Photography deals on Amazon?
View Offers →Advanced Techniques for the Sigma 12mm f/1.4
To get the most out of your setup, consider the "Hyperfocal Distance" technique. Because wide-angle lenses have an inherently large depth of field, you can set your focus to a specific point—calculated based on your aperture—where everything from half that distance to infinity will be in acceptable focus. For the Sigma 12mm at f/8, focusing just a few feet in front of the lens will keep the entire world sharp. This is incredibly useful for street photography or fast-moving landscape situations where you don't want to rely on autofocus hunting.
Furthermore, consider the "Aperture Ring" workflow. If you are a landscape photographer, you likely want to lock the ring in the "A" position to control aperture via the camera dial. However, if you are working in a studio or doing street work, unlocking the ring allows for a more tactile experience. The "Click" switch on the lens is a game-changer for hybrid shooters. For stills, the clicks provide tactile feedback so you know exactly how many stops you have moved without looking. For video, flipping the switch to "De-click" allows you to pull exposure smoothly as you transition from a dark interior to a bright exterior without a jarring jump in brightness.
Maintaining the Setup
Longevity is a concern for any piece of equipment. The Sigma 12mm, with its complex moving parts and large elements, should be maintained with care. Use a rocket blower to remove dust before using a microfiber cloth. Because the front element is so close to the edge of the lens hood, it is easy to accidentally touch it while mounting filters. Keeping a clean kit in your bag is non-negotiable. Additionally, ensure your camera body’s firmware is up to date. Sigma frequently releases firmware updates for their lenses (often via the camera body interface), which can further improve autofocus tracking and compatibility with newer internal stabilization algorithms.
It is also worth noting the software side of maintenance. When importing photos into programs like Adobe Lightroom or Capture One, ensure that the lens profile for the "Sigma 12mm F1.4 DG DN C" is applied. While the in-camera corrections are good for JPEGs, RAW files require these profiles to remove any remaining vignetting and to straighten out the minor barrel distortion inherent to such a wide focal length. By including this step in your digital workflow, the images from this lens will consistently look professional and technically flawless.
Conclusion
The Sigma 12mm f/1.4 DC DN Contemporary is a masterclass in APS-C lens design. It challenges the notion that cropped-sensor users must settle for slower glass or lower-quality construction. Setting up this lens is an intentional process—it involves balancing the physical weight, configuring the camera's internal compensation profiles, and understanding the optical characteristics that allow it to shine in low light. When configured correctly, it transforms a standard mirrorless camera into a powerhouse for astro, architecture, and cinematic video. While its size and weight are considerations for the minimalist traveler, the sheer image quality and professional features like the de-clickable aperture ring make it an indispensable tool for anyone serious about wide-angle photography. By following a structured approach to hardware and software setup, you ensure that every frame captured through this glass is sharp, vibrant, and distortion-free.